
Stylish Storage for a Small Bathroom

Storage has been a huge problem in our bathroom and in our apartment in general. We have a pedestal sink, so the only storage we had in the bathroom was in our medicine cabinet. We don't have a linen closet either, in fact, we only have one closet in our little one bedroom apartment. I have always loved the look of floating shelves, and when I saw this tutorial from Four Generations One Roof, I knew this was the solution for our problem.

The tutorial made this project look so simple, and it was in theory... However, cutting shelves to fit snugly between two walls is pretty tricky -- even trickier when the walls are slightly out of square and you don't have the right tools. As Anthony and I were trying to cut roughly 45" straight lines through 3/4" plywood with a circular saw, we had a nice little squabble, me saying what we really needed was my dad's table saw and Anthony assuring me that we could make it work with the tools we had. It didn't work at all. Our wobbly cuts were only made worse by the out of square walls and driving in finishing nails with a hammer was next to impossible when working so close to our newly painted walls. At 10:00 pm that night, we started dismantling our sorry first attempt at shelves.
The next day, I called my Dad to ask for some help (and the use of his table saw, miter saw and nail gun). Having the right tools made a HUGE difference! My dad showed us how to use hollow wall anchors to support the cleats on the side walls, since we did not have a stud there to anchor them to. Using his metal square and some trial-and-error, my dad cut the shelves to fit perfectly in between the imperfect walls. He was a lifesaver! Anthony finished up the shelves, attaching 1"x 3"s with a nail gun to give the shelves a chunkier look.
The tutorial mentions caulking the seams, which seemed like a great way to disguise and small gaps between the shelves and the walls. I had never caulked anything before, and even though I cut the hole in the tube very small I was having trouble getting a thin, smooth line in the seams. After some trial and error, I came up with my own method of laying down a line as best I could, smoothing it with my finger and then cleaning up the excess that inevitably got on the walls with a damp paper towel. It was messy but it worked! I just ran a search on Pinterest for tips on caulking seams, and it looks like my method is a popular one! Check out Shanty 2 Chic's How to Caulk for step by step instructions and save yourself the trial-and-error that I had to do! After the caulk was dry, I lightly sanded the shelves and wiped off the dust with a paper towel before painting them with two coats of Sherwin-Williams Multipurpose Latex primer. I let the primer dry a full 12 hours before finishing them off with two coats of their All-Surface Enamel in un-tinted white. Taping is probably the best way to get clean lines when working so close to the wall, but I had a deadline (my friends were coming to town the next afternoon) and didn't feel like driving to the hardware store. I painted as carefully as I could, but of course I got some white paint onto our blue walls. The next morning, I woke up at 5:00 am to touch up the walls with more blue paint. I used a small (I want to say 3/8") paintbrush from my craft supplies. This brush gave me more control and I was able to get much closer to the corners than I could with my 2" Purdy XL Cub. It might have been an extra step, but my paint job turned out great!

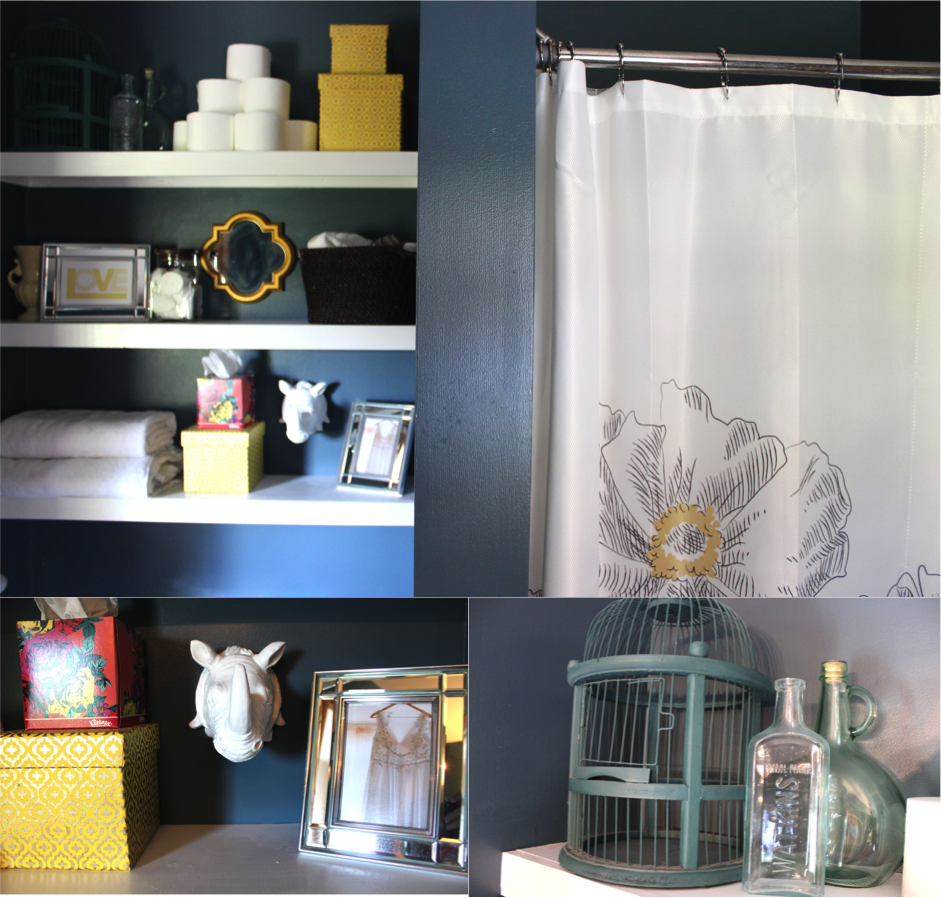
I got home from work at 2:00 pm that day, and set to work with styling the shelves with the storage and decorative accessories I have been collecting since May. My color scheme for the room is navy, yellow, gold and silver. I debated using coral instead of yellow, but Anthony vetoed that idea. I still slipped in a little coral with this awesome Kleenex box designed by Isaac Mizrahi. It's a limited edition design, but I love it so much that I might have to stock up! I finished just in time for when my friends arrived. It's been about a week since they've been finished and I love having the easy access open storage. Some simple styling makes everyday items, like towels, tissues and toilet paper look like decorative accessories!

At the beginning of the summer, I did this quick DIY -- painting an old filing cabinet white and getting a piece of acrylic cut down to protect the top. We had just enough space to slide it in beside our pedestal sink. I love having a place to store my makeup and hair tools, and it nice to have a little bit of counter space!
Sources:
Yellow & Gold Boxes - Home Goods
Birdcage - Tuesday Morning // gift from Anthony.
(That's right,my husband buys me decorative/non-functional birdcages. Doesn't yours??)
Antique Blue Bottles - 1 thrifted, 1 from my Gram's collection
Woven Basket - Target
Gold Mirror - Ross
Wood Top Canister - gift from Ella
Mirrored Frames - Ross
LOVE Print - Field Trip
Yellow vase/urn - belonged to my Great-Grandmother
Rhino Sculpture - Ross
Shower Curtain - Target (on sale now!)
Chartreuse vase & Yellow bowl - made by me!
Vintage cigar box - from Anthony's collection
"Bain" sphere vase - gift from Jackie & Rachel
Striped hand towel - Gabriel Brothers
And, just in case your were wondering...
Necklace - Forever 21
