
How To Remove Mold & Mildew From Your Basement | Part #1
Confession: When talking about our house hunt with family and friends, we referred to what would become our new home as the "Moldy Basement House".
Anthony and I were purposefully looking for a fixer upper, but a mold problem seemed like a can of worms that we just didn't want to get into. If you've watched any house hunting TV shows, you know that the slightest suggestion of mold strikes fear into the heart of most homebuyers. For many people, discovering mold is an instant deal breaker when shopping for a new house. Lucky for us, we had a real estate agent we trusted, who had decades of experience renovating, flipping and living in old houses who told us something along the lines of this:
The trick to getting rid of a mold problem is to find the source of the moisture and stop it. After that, all that's left to do is clean up.
After some closer inspection and research we decided it was a job that we were totally capable of tackling. Today, I'm talking about how we determined the source of the moisture problem, why it wasn't a deal breaker and how we are keeping it from coming back. Tomorrow, I'll be sharing the simple and easy way that we removed the mold and mildew from the basement. So if you are considering buying a "fixer upper" or if you already have one on your hands, check back tomorrow to read about what we did.
Since there were many things we did like about the house, we decided to schedule a second showing so we could get our Dads' opinion on the basement situation. Here's a peek at what we were up against:

At that second showing, we search the basement high and low. Because our house was a foreclosure that had been winterized (aka all the utilities were shut off and the pipes were drained) we knew that there weren't any active pipe leaks that could have been causing the moisture problem. So we looked for evidence that water may be coming in from the outside. Renew Services Home Group wrote a great post detailing the most common types of basement leaks, what causes them and what it takes to fix them. Read the full article, here.
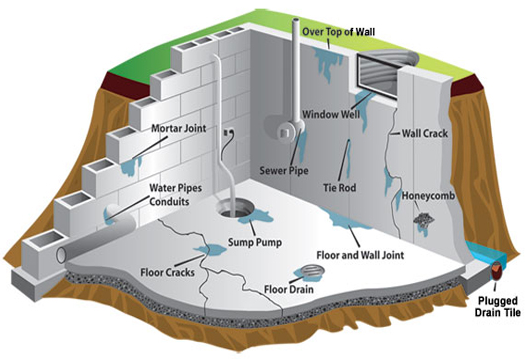
Image credit: Renew Services Home Group
There didn't appear to be any leaks causing the moisture problem, so we determined that the real culprit behind the mold issue was humidity. There are several reasons why basements tend to be damp and humid. Obviously if you have a leaking basement with standing pools of water, you can expect to experience dampness but there are other humidity causing factors that have nothing to do with leaks. For example, the most common cause of increased indoor humidity is moisture migrating up through a concrete foundation and then evaporating. Also during hot, humid months, it is common for condensation to form on cool concrete walls and floors, which will also then evaporate and increase the humidity levels. When you combine this with the fact that our house had been closed up with no ventilation for over two years, it is easy to understand how a mold problem developed.
So once we found the source of the moisture problem (the humidity), and considered the solution (bringing in some dehumidifiers), we realized that this wasn't a deal breaker for us. In addition, the walls of the basement were mostly concrete and paneling which don't absorb moisture the way that drywall does. Clean up would just take some bleach, water and elbow grease, versus if the whole basement had been drywalled, it would have been a larger expense to replace it throughout.
So, we decided to buy the "Moldy Basement House" anyway!
After we took possession of the house and had the dehumidifiers running for a couple of days, the basement already felt much drier. The only problem with dehumidifiers is that you have to routinely empty the water that collects otherwise they stop running.
We combatted this by rigging up one of the dehumidifiers to run continuously. We were lucky to have a small bathroom (which we don't use) already in the basement. Anthony built this simple shelf outside of the bathroom, and then drilled a hole through the paneling for a rubber tube to pass through the wall and into the shower, allowing the dehumidifier to drain continuously.


We had effectively stopped the spread of mold and mildew, so next we moved onto clean up. To learn exactly how we got rid of the mold and see some progress pictures, come back tomorrow! Or... you can subscribe to my blog via email and have tomorrow's post sent straight to your inbox ;)